ในที่นี่ต้อง Download Oracle 11g RAC ที่
Oracle Database 11g Release 2 (11.2.0.3) is available in the latest media pack.
| Patch Number 10404530 | Oracle Database Family: Patchset 11.2.0.3.0 PATCH SET FOR ORACLE DATABASE SERVER |
..
| Installation Type | Zip File |
| Oracle Database (includes Oracle Database and Oracle RAC)Note: you must download both zip files to install Oracle Database. | p10404530_112030_platform_1of7.zipp10098816_112020_platform_2of7.zip |
| Oracle Grid Infrastructure (includes Oracle ASM, Oracle Clusterware, and Oracle Restart) | p10404530_112030_platform_3of7.zip |
| Oracle Database Client | p10404530_112030_platform_4of7.zip |
| Oracle Gateways | p10404530_112030_platform_5of7.zip |
| Oracle Examples | p10404530_112030_platform_6of7.zip |
| Deinstall | p10404530_112030_platform_7of7.zip |
1.VM 3 ตัวซึ่งติดตั้ง บน Virtual Box
ประกอบด้วย
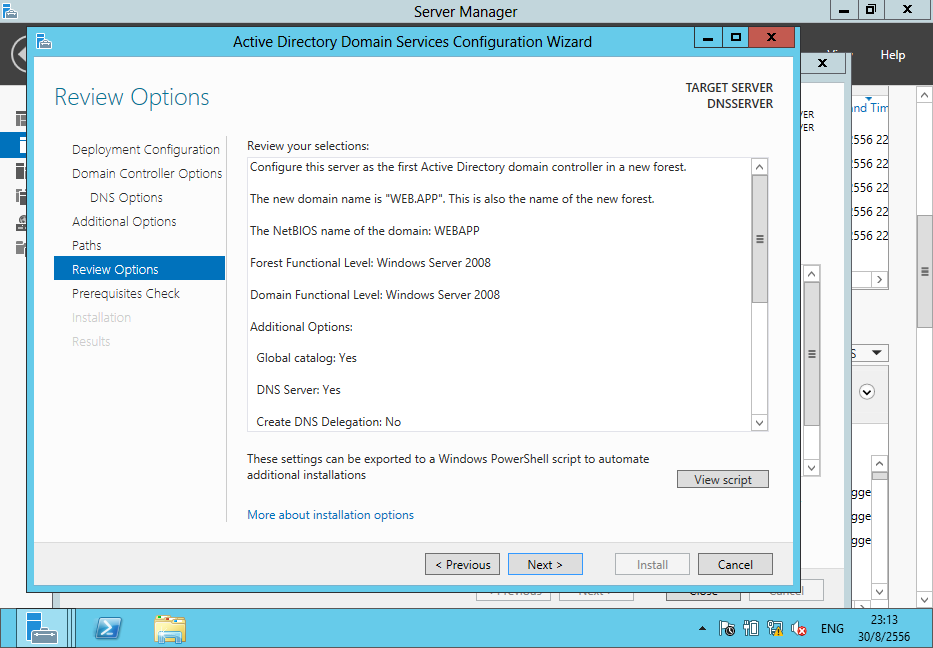
1.1 DNSSERVER
- ติดตั้ง Windows Server 2012
- ติดตั้ง AD และ DNS
- กำหนดค่า Host Name = dnsserver
- กำหนดค่า Domain Name = WEB.APP
- กำหนดค่า LAN 1 = IP : 192.168.99.252
Subnet Mask : 255.255.255.0
1.2 W11GR2-RAC-1
- ติดตั้ง Windows Server 2008 R2
- ติดตั้ง Oracle 11g R2 Grid Infrastructure
- ติดตั้ง Oracle 11g R2 Database
- กำหนดค่า Host Name = w11gr2-rac-1
- กำหนดค่า Domain Name = WEB.APP
- กำหนดค่า LAN 1 = IP : 192.168.99.250
Subnet Mask : 255.255.255.0
Gateway : 192.168.99.252
DNS1 : 192.168.99.252
- กำหนดค่า LAN 2 = IP : 192.168.1.250
Subnet Mask : 255.255.255.0
- ติดตั้ง Windows Server 2008 R2
- ติดตั้ง Oracle 11g R2 Grid Infrastructure
- ติดตั้ง Oracle 11g R2 Database
- กำหนดค่า Host Name = w11gr2-rac-2
- กำหนดค่า Domain Name = WEB.APP
- กำหนดค่า LAN 1 = IP : 192.168.99.251
- กำหนดค่า Domain Name = WEB.APP
- กำหนดค่า LAN 1 = IP : 192.168.99.251
Subnet Mask : 255.255.255.0
Gateway : 192.168.99.252
DNS1 : 192.168.99.252
- กำหนดค่า LAN 2 = IP : 192.168.1.251
Subnet Mask : 255.255.255.0
1.4 กำหนดค่า hosts File ทั้ง 3 VM ดังนี้
192.168.99.252 dnsserver.web.app
192.168.99.252 web.app
127.0.0.1 localhost.web.app localhost
::1 localhost
# Public
192.168.99.250 w11gr2-rac-1.web.app w11gr2-rac-1
192.168.99.251 w11gr2-rac-2.web.app w11gr2-rac-2
#Private
192.168.1.150 w11gr2-rac-1-priv.web.app w11gr2-rac-1-priv
192.168.1.151 w11gr2-rac-2-priv.web.app w11gr2-rac-2-priv
#Virtual
192.168.99.150 w11gr2-rac-1-vip.web.app w11gr2-rac-1-vip
192.168.99.151 w11gr2-rac-2-vip.web.app w11gr2-rac-2-vip
#scan (192.168.99.231 - 192.168.99.234 in DNS)
# After install Grid completely , remove # of The all scan IP bellow then restart after done that will pass multicast verification
192.168.99.231 w11gr2-rac.web.app w11gr2-rac
192.168.99.232 w11gr2-rac.web.app w11gr2-rac
192.168.99.233 w11gr2-rac.web.app w11gr2-rac
192.168.99.234 w11gr2-rac.web.app w11gr2-rac
2.1 ติดตั้ง Active Directory และ DNS


2.4 Add Host ตามค่าใน host File ที่ DNS->Forward


3.ขั้นเตรียมการเพื่อติดตั้ง Oracle RAC
บน VM 1.2 และ 1.3 ดังนี้
3.1 ยกเลิก Media.Sensing.TCP.IP
โดยเปิดโปรแกรม regedit แล้วกำหนดค่า เพิ่มเติม
[HKEY_LOCAL_MACHINE\SYSTEM\CurrentControlSet\Services\Tcpip\Parameters]
"DisableDHCPMediaSense"=dword:00000001

3.2 ยกเลิก TCPV.6 และ Features ที่เกี่ยวข้อง
3.2.1 เปิดโปรแกรม regedit แล้วกำหนดค่า เพิ่มเติม
[HKEY_LOCAL_MACHINE\SYSTEM\CurrentControlSet\services\TCPIP6\Parameters]
"DisabledComponents"=dword:ffffffff

3.2.2 เปิดโปรแกรม command (cmd) แล้ว พิมพ์คำสั่ง
netsh Interface 6to4 set state state=disabled
netsh interface isatap set state disabled
netsh interface teredo set state disabled

3.2.3 ปิดการทำงานของ native IPv6 interfaces
Download “Disable native IPv6 interfaces” - http://go.microsoft.com/?linkid=9732131


3.2.4 ปิดการทำงานของ tunnel IPv6 interfaces


3.3 ทำการปิด Firewall ของ Windows ดังนี้
3.3.1 เปิดโปรแกรม Windows Firewall and Advanced Security
(อยู่ที่ Control Panel > Administrative Tools)
ในส่วนของ Windows Firewall Properties
ให้ Turn Off Firewall State ทั้งหมด ที่ Domain Profile , Private Profile , Public Profile

ให้ไปที่ InBound Rule ให้ เลือกทั้งหมด แล้ว disable


ให้ไปที่ OutBound Rule ให้ เลือกทั้งหมด แล้ว disable


3.3.2 เปิดโปรแกรม Services
(อยู่ที่ Control Panel > Administrative Tools)
ให้ Stop Windows Firewall และ กำหนดค่าเป็น Disable


3.4 กำหนดค่า hosts File ที่ c:\Windows\System32\drivers\etc\hosts ตามข้อ 1.4 และ Add เข้าสู่ Domain WEB.APP

โดยขั้นตอนข้อ 3 นี้ตั้งทำทั้ง 2 VM แล้ว restart VM


และทำการ Login ผ่าน Domain Name WEB.APP\Administrator


หลังจากนั้น Shutdown VM
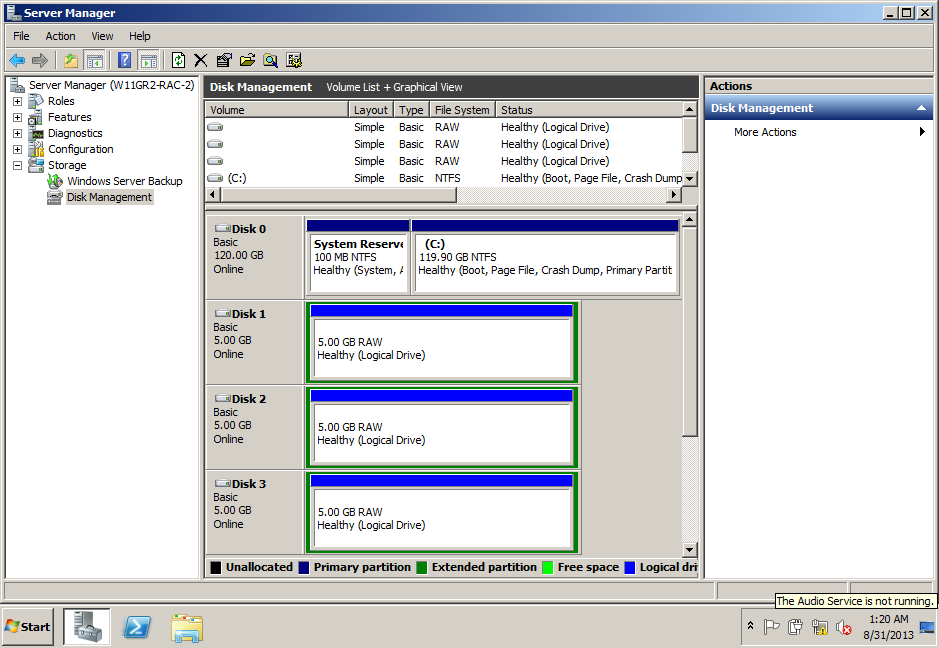
4.สร้างและกำหนดค่าDisk Oracle Automatic System Management Disk
สำหรับติดตั้ง Oracle RAC บน VM
ก่อนดำเนินการให้ Shutdown VM 1.2 และ 1.3 ก่อน
4.1 สร้าง Share Disk สำหรับติดตั้ง บนVM
ในที่นี้ VM อยู่ที่ Path C:\0.VM\GCOOP\RAC ต้องทำการสร้าง อย่างน้อย 3 Disks สำหรับติดตั้ง RAC โดยมีขนาด File อย่างน้อย 5GB
โดยการเปิดโปรแกรม command (cmd) แล้ว พิมพ์คำสั่ง
SET PATH=C:\Program Files\Oracle\VirtualBox;%PATH%
cd C:\0.VM\GCOOP\RAC
rem Create the disks and associate them with VirtualBox as virtual media.
VBoxManage createhd --filename oracle-asm1.vdi --size 5120 --format VDI --variant Fixed
VBoxManage createhd --filename oracle-asm2.vdi --size 5120 --format VDI --variant Fixed
VBoxManage createhd --filename oracle-asm3.vdi --size 5120 --format VDI --variant Fixed
rem Make shareable.
VBoxManage modifyhd oracle-asm1.vdi --type shareable
VBoxManage modifyhd oracle-asm2.vdi --type shareable
VBoxManage modifyhd oracle-asm3.vdi --type shareable

4.2 เพิ่ม Disk ที่สร้างจากข้อ 4.1 ให้กับ VM 1.2 เครื่อง W11GR2-RAC-1
ในที่นี้ VM 1.2 อยู่ที่ Path C:\0.VM\GCOOP\RAC\W11GR2-RAC-1 ทำการ Add
โดยการเปิดโปรแกรม command (cmd) แล้ว พิมพ์คำสั่ง
SET PATH=C:\Program Files\Oracle\VirtualBox;%PATH%
cd C:\0.VM\GCOOP\RAC\W11GR2-RAC-1
VBoxManage storageattach W11GR2-RAC-1 --storagectl "SATA" --port 1 --device 0 --type hdd --medium ../oracle-asm1.vdi --mtype shareable
VBoxManage storageattach W11GR2-RAC-1 --storagectl "SATA" --port 2 --device 0 --type hdd --medium ../oracle-asm2.vdi --mtype shareable
VBoxManage storageattach W11GR2-RAC-1 --storagectl "SATA" --port 3 --device 0 --type hdd --medium ../oracle-asm3.vdi --mtype shareable


4.3 เพิ่ม Disk ที่สร้างจากข้อ 4.1 ให้กับ VM 1.3 เครื่อง W11GR2-RAC-2
ในที่นี้ VM 1.3 อยู่ที่ Path C:\0.VM\GCOOP\RAC\W11GR2-RAC-2 ทำการ Add
โดยการเปิดโปรแกรม command (cmd) แล้ว พิมพ์คำสั่ง
SET PATH=C:\Program Files\Oracle\VirtualBox;%PATH%
cd C:\0.VM\GCOOP\RAC\W11GR2-RAC-2
VBoxManage storageattach W11GR2-RAC-2 --storagectl "SATA" --port 1 --device 0 --type hdd --medium ../oracle-asm1.vdi --mtype shareable
VBoxManage storageattach W11GR2-RAC-2 --storagectl "SATA" --port 2 --device 0 --type hdd --medium ../oracle-asm2.vdi --mtype shareable
VBoxManage storageattach W11GR2-RAC-2 --storagectl "SATA" --port 3 --device 0 --type hdd --medium ../oracle-asm3.vdi --mtype shareable


4.4 เพิ่ม Disk บน VM และ กำหนดให้พร้อมใช้งาน
โดยให้ start VM 1.2 และ 1.3
4.4.1 เปิดโปรแกรม Computer Management แล้วไปที่ Disk Managment
สำหรับกรณี ที่ VM 1.2 ครั้งแรกจะพบว่ามี Dialog ให้Set MBR


4.4.2 แล้วเปิด command (cmd) พิมพ์คำสั่ง
diskpart
list disk
automount enable
select disk 1
create partition extended
create partition logical
select disk 2
create partition extended
create partition logical
select disk 3
create partition extended
create partition logical
exit
สำหรับกรณี ที่ VM 1.2 ครั้งแรกจะพบว่ามี Dialog ให้Set MBR


diskpart
list disk
automount enable
select disk 1
create partition extended
create partition logical
select disk 2
create partition extended
create partition logical
select disk 3
create partition extended
create partition logical
exit


4.4.3 จะพบว่าได้ Disk ตามรูป ให้กับไปที่ VM 1.3 กด Rescan ที่ Disk Management
กรณีถามให้ Format ให้กด Cancel


และ Remove Drive Letter ออก ทั้ง 3 Drive


4.4.4 Formate Disk และ สร้าง ASM Label
เปิดโปรแกรม command (cmd) พิมพ์คำสั่ง (ให้ทำครั้งเดียวที่เครื่องใดเครื่อง หนึ่ง)
5.ตรวจสอบความสมบรูณ์ก่อนการติดตั้งทั้ง 2 VM 1.2 และ 1.3 ดังนี้
5.1 เปิดโปรแกรม command (cmd) พิมพ์คำสั่ง
net use \\W11GR2-RAC-1\c$
net use \\W11GR2-RAC-2\c$

5.2 เปิดโปรแกรม command (cmd) พิมพ์คำสั่ง
ping W11GR2-RAC-1
ping W11GR2-RAC-2
ping W11GR2-RAC-1-priv
ping W11GR2-RAC-2-priv


nslookup W11GR2-RAC


ต้องสามารถทำงานได้สมบรูณ์ ได้รับ IP ตามที่ระบุใน hosts File ข้อ 1.4
5.3 ตรวจสอบการผ่านค่าตรวจสอบของ Oracle RAC โดย
เปิดโปรแกรม command (cmd) พิมพ์คำสั่ง
ในที่นี่ software Oracle Grid อยที่ C:\Setup\Oracle.11.2.0.3\WIN64\grid
cd C:\Setup\Oracle.11.2.0.3\WIN64\grid
runcluvfy.bat stage -pre crsinst -n W11GR2-RAC-1,W11GR2-RAC-2 -verbose

โดยสรุปจะได้รายละเอียดดังนี้
Performing pre-checks for cluster services setup
Checking node reachability...
Check: Node reachability from node "w11gr2-rac-1"
Destination Node Reachable?
------------------------------------ ------------------------
W11GR2-RAC-1 yes
W11GR2-RAC-2 yes
Result: Node reachability check passed from node "w11gr2-rac-1"
Checking user equivalence...
Check: User equivalence for user "administrator"
Node Name Status
------------------------------------ ------------------------
W11GR2-RAC-2 passed
W11GR2-RAC-1 passed
Result: User equivalence check passed for user "administrator"
Checking node connectivity...
Interface information for node "W11GR2-RAC-2"
Name IP Address Subnet Gateway Def. Gateway HW Address MTU
------ --------------- --------------- --------------- --------------- ----------------- ------
LAN-1 192.168.99.251 192.168.99.0 On-link UNKNOWN 08:00:27:56:B4:69 1500
LAN-2 192.168.1.251 192.168.1.0 On-link UNKNOWN 08:00:27:EB:69:19 1500
Interface information for node "W11GR2-RAC-1"
Name IP Address Subnet Gateway Def. Gateway HW Address MTU
------ --------------- --------------- --------------- --------------- ----------------- ------
LAN-1 192.168.99.250 192.168.99.0 On-link UNKNOWN 08:00:27:6E:44:AC 1500
LAN-2 192.168.1.250 192.168.1.0 On-link UNKNOWN 08:00:27:0F:5F:C7 1500
Check: Node connectivity of subnet "192.168.99.0"
Source Destination Connected?
------------------------------ ------------------------------ ----------------
W11GR2-RAC-2[192.168.99.251] W11GR2-RAC-1[192.168.99.250] yes
Result: Node connectivity passed for subnet "192.168.99.0" with node(s) W11GR2-RAC-2,W11GR2-RAC-1
Check: TCP connectivity of subnet "192.168.99.0"
Source Destination Connected?
------------------------------ ------------------------------ ----------------
w11gr2-rac-1:192.168.99.250 W11GR2-RAC-2:192.168.99.251 passed
w11gr2-rac-1:192.168.99.250 W11GR2-RAC-1:192.168.99.250 passed
Result: TCP connectivity check passed for subnet "192.168.99.0"
Check: Node connectivity of subnet "192.168.1.0"
Source Destination Connected?
------------------------------ ------------------------------ ----------------
W11GR2-RAC-2[192.168.1.251] W11GR2-RAC-1[192.168.1.250] yes
Result: Node connectivity passed for subnet "192.168.1.0" with node(s) W11GR2-RAC-2,W11GR2-RAC-1
Check: TCP connectivity of subnet "192.168.1.0"
Source Destination Connected?
------------------------------ ------------------------------ ----------------
w11gr2-rac-1:192.168.1.250 W11GR2-RAC-2:192.168.1.251 passed
w11gr2-rac-1:192.168.1.250 W11GR2-RAC-1:192.168.1.250 passed
Result: TCP connectivity check passed for subnet "192.168.1.0"
Interfaces found on subnet "192.168.99.0" that are likely candidates for a private interconnect are:
W11GR2-RAC-2 LAN-1:192.168.99.251
W11GR2-RAC-1 LAN-1:192.168.99.250
Interfaces found on subnet "192.168.1.0" that are likely candidates for a private interconnect are:
W11GR2-RAC-2 LAN-2:192.168.1.251
W11GR2-RAC-1 LAN-2:192.168.1.250
WARNING:
Could not find a suitable set of interfaces for VIPs
Checking subnet mask consistency...
Subnet mask consistency check passed for subnet "192.168.99.0".
Subnet mask consistency check passed for subnet "192.168.1.0".
Subnet mask consistency check passed.
Result: Node connectivity check passed
Checking multicast communication...
Checking subnet "192.168.99.0" for multicast communication with multicast group "230.0.1.0"...
Check of subnet "192.168.99.0" for multicast communication with multicast group "230.0.1.0" passed.
Checking subnet "192.168.1.0" for multicast communication with multicast group "230.0.1.0"...
Check of subnet "192.168.1.0" for multicast communication with multicast group "230.0.1.0" passed.
Check of multicast communication passed.
Checking the status of Windows firewall
Node Name Enabled? Comment
------------ ------------------------ ------------------------
W11GR2-RAC-2 no passed
W11GR2-RAC-1 no passed
Result: Windows firewall verification check passed
Check: Total memory
Node Name Available Required Status
------------ ------------------------ ------------------------ ----------
W11GR2-RAC-2 1.9996GB (2096696.0KB) 922MB (944128.0KB) passed
W11GR2-RAC-1 1.9996GB (2096696.0KB) 922MB (944128.0KB) passed
Result: Total memory check passed
Check: Available memory
Node Name Available Required Status
------------ ------------------------ ------------------------ ----------
W11GR2-RAC-2 1.6293GB (1708420.0KB) 50MB (51200.0KB) passed
W11GR2-RAC-1 1.4256GB (1494900.0KB) 50MB (51200.0KB) passed
Result: Available memory check passed
Check: Swap space
Node Name Available Required Status
------------ ------------------------ ------------------------ ----------
W11GR2-RAC-2 3.9991GB (4193392.0KB) 2.9993GB (3145044.0KB) passed
W11GR2-RAC-1 3.9991GB (4193392.0KB) 2.9993GB (3145044.0KB) passed
Result: Swap space check passed
Check: Free disk space for "W11GR2-RAC-2:C:\Windows\temp"
Path Node Name Mount point Available Required Status
---------------- ------------ ------------ ------------ ------------ ------------
C:\Windows\temp W11GR2-RAC-2 C 111.3135GB 1GB passed
Result: Free disk space check passed for "W11GR2-RAC-2:C:\Windows\temp"
Check: Free disk space for "W11GR2-RAC-1:C:\Windows\temp"
Path Node Name Mount point Available Required Status
---------------- ------------ ------------ ------------ ------------ ------------
C:\Windows\temp W11GR2-RAC-1 C 110.9946GB 1GB passed
Result: Free disk space check passed for "W11GR2-RAC-1:C:\Windows\temp"
Check: System architecture
Node Name Available Required Status
------------ ------------------------ ------------------------ ----------
W11GR2-RAC-2 64-bit 64-bit passed
W11GR2-RAC-1 64-bit 64-bit passed
Result: System architecture check passed
Checking length of value of environment variable "PATH"
Check: Length of value of environment variable "PATH"
Node Name Set? Maximum Length Actual Length Comment
---------------- ------------ ------------ ------------ ----------------
W11GR2-RAC-2 yes 5119 100 passed
W11GR2-RAC-1 yes 5119 130 passed
Result: Check for length of value of environment variable "PATH" passed.
Checking for Media Sensing status of TCP/IP
Node Name Enabled? Comment
------------ ------------------------ ------------------------
W11GR2-RAC-2 no passed
W11GR2-RAC-1 no passed
Result: Media Sensing status of TCP/IP check passed
Starting Clock synchronization checks using Network Time Protocol(NTP)...
Checking daemon liveness...
Check: Liveness for "W32Time"
Node Name Running?
------------------------------------ ------------------------
W11GR2-RAC-2 yes
W11GR2-RAC-1 yes
Result: Liveness check passed for "W32Time"
Check for NTP daemon or service alive passed on all nodes
Result: Clock synchronization check using Network Time Protocol(NTP) passed
Checking if current user is a domain user...
Check: If user "administrator" is a domain user
Result: User "administrator" is a part of the domain "WEBAPP"
Check: Time zone consistency
Result: Time zone consistency check passed
Checking for status of Automount feature
Node Name Enabled? Comment
------------ ------------------------ ------------------------
W11GR2-RAC-2 yes passed
W11GR2-RAC-1 yes passed
Result: Check for status of Automount feature passed
Pre-check for cluster services setup was successful.
6. ติดตั้ง Oracle 11g R2 Grid Infrastructure
6.1 กำหนดค่าเพื่อติดตั้ง


ทำจนครบทั้ง 3 Drive


6.2 ดำเนินการติดตั้ง


6.3 ให้แก้ไข host file ทั้ง VM 1.2 และ 1.3 โดยcommentsในส่วนของ w11gr2-rac ออก


ข้อสังเกตคือ ถ้ากำหนดค่าและติดตั้งได้ถูกต้อง ในส่วนของ DNS หลังติดตั้งจะมีการ Add Host Name ของ RAC1 และ RAC2 ในส่วนของ IP ที่เป็น Scan ตรงตาม Service ของ SCAN_LISTENER คือ
ในที่นี่ w11gr2-rac-1 ได้ใช้ SCAN_LISTENER ดังนี้

และ โดยในที่นี่ w11gr2-rac-2 ได้ใช้ SCAN_LISTENER ดังนี้

ดังนั้นที่ DNSServer จะมีการ Add Host IP ของ w11gr2-rac-1 และ w11gr2-rac-2 ให้สอดคล้องกับ Service SCAN_LISTNER ที่ Oracle RAC ทำงานตามนี้

6.4 ติดตั้งสำเร็จ ทดสอบตรวจผลการติดตั้ง


ซึ่งจะทำให้สามารถทำงาน multicast Networkได้ ผ่าน DNS server ที่จะทดสอบในข้อ 6.4
ข้อสังเกตคือ ถ้ากำหนดค่าและติดตั้งได้ถูกต้อง ในส่วนของ DNS หลังติดตั้งจะมีการ Add Host Name ของ RAC1 และ RAC2 ในส่วนของ IP ที่เป็น Scan ตรงตาม Service ของ SCAN_LISTENER คือ
ในที่นี่ w11gr2-rac-1 ได้ใช้ SCAN_LISTENER ดังนี้
และ โดยในที่นี่ w11gr2-rac-2 ได้ใช้ SCAN_LISTENER ดังนี้

ดังนั้นที่ DNSServer จะมีการ Add Host IP ของ w11gr2-rac-1 และ w11gr2-rac-2 ให้สอดคล้องกับ Service SCAN_LISTNER ที่ Oracle RAC ทำงานตามนี้

6.4 ติดตั้งสำเร็จ ทดสอบตรวจผลการติดตั้ง
เปิดโปรแกรม command (cmd) พิมพ์คำสั่ง
ในที่นี่ software Oracle Grid อยที่ C:\Setup\Oracle.11.2.0.3\WIN64\grid
cd C:\Setup\Oracle.11.2.0.3\WIN64\grid
runcluvfy.bat stage -post crsinst -n W11GR2-RAC-1,W11GR2-RAC-2 -verbose
7. ติดตั้ง Oracle 11g R2 Database RAC
7.1 กำหนดค่าเพื่อติดตั้ง


7.2 ดำเนินการติดตั้ง


7.3 ติดตั้งสำเร็จ ทดสอบตรวจผลการติดตั้ง
เปิดโปรแกรม command (cmd) พิมพ์คำสั่ง
ในส่วนของ SQLPLUS
>sqlplus system@w11gr2-rac.web.app:1521/gcoop.web.app as sysdba
ทดสอบเปิดผ่าน DBCONSOLE
http://w11gr2-rac.web.app:1158/em/

